Other Articles
- IAM - Enable User MFA
- IAM - Enforce Key Rotation
- IAM - Enforce Active Key Limit
- IAM - Disable Unused User Credentials
- IAM - Enforce Group Permission
- IAM - Enforce Password Length
- IAM - Prohibit Password Reuse
- IAM - Check Root Access Keys Existence
- IAM - Enable Root MFA
- IAM - Establish Support Role
- IAM - Enable Key Rotation
- Purge Expired Certificates
- EC2 Volume – Enable EBS Volume Backup
- EC2 Volume – Enable EBS Encryption
- EFS – Enable EFS Storage Backup
- S3 Bucket – Enable S3 Bucket Versioning
- S3 Bucket – Enable S3 Bucket Encryption
- S3 Bucket – Block S3 Bucket Public Access
- RDS DB Instance – Encryption of Storage
- RDS DB Instance – Enable Deletion Protection
- RDS DB Instance – Enable Auto Minor Version Upgrade
- DynamoDB Table – Enable Table Encryption
- DynamoDB Table – Enable Table Point In Time Recovery
- DynamoDB Table – Enable Table Deletion Protection
- EKS Cluster – Enable Secrets Encryption
- OpenSearch Domain – Enable Encryption at Rest
- RDS DB Cluster – Retain Backups for 7 Days
- RDS DB Cluster – Enable Deletion Protection
- EC2 Instance – Monitor CPU Utilization
- ECS Service – Monitor CPU Utilization
- ECS Service – Monitor Memory Utilization
- RDS DB Instance – Monitor Free Storage Space
- RDS DB Instance – Monitor CPU Utilization
- SQS Queue – Monitor Message Age
- SQS Queue – Monitor Message Visibility
- DynamoDB Table – Monitor Table Read Capacity
- DynamoDB Table – Monitor Table Write Capacity
- DynamoDB Table – Monitor Table Latency
- Enable CloudTrail
- Encrypt CloudTrail Logs
- EC2 VPC – Ensure Flow Logs are Enabled
- EKS Cluster – Enable Control Plane Logging
- CloudWatch Log Group – Enable KMS Encryption
- CloudWatch Log Group – Configure Retention
- Load Balancer – Enable Access Logs
- RDS DB Instance – Block Public Access
- EC2 Security Group – Restrict Public SSH and RDP Access
- EC2 Security Group – Restrict Public Database Access
- EKS Cluster – Restrict Public Endpoint
- EC2 VPC – Restrict Default Security Group Traffic
- Load Balancer – Redirect HTTP Traffic to HTTPS
- Load Balancer – Use Strong TLS Policies
- OpenSearch Domain – Enable Node-to-Node Encryption
- OpenSearch Domain – Enforce HTTPS
- OpenSearch Domain – Restrict Public Access
- RDS DB Cluster – Block Public Access
- EC2 Instance – Enable Deletion Protection
- ECS Service – Enable Auto Scaling
- Load Balancer – Enable Deletion Protection
- Enable AWS Security Hub
- Enable GuardDuty
- CloudFront Distribution – Enforce HTTPS for Viewers
- CloudFront Distribution – Require TLS 1.2 for Viewers
- CloudFront Distribution – Associate a WAF Web ACL
- CloudFront Distribution – Protect S3 Origin Access
- KMS Key – Avoid Pending Deletion
- SNS Topic – Enable Encryption
- SNS Topic – Restrict Topic Policy Access
RDS DB Cluster – Encryption of Storage
Secure Configuration Checks > AWS
This check ensures that encryption at rest is enabled for the storage of Amazon RDS DB clusters, such as Amazon Aurora clusters. Encryption protects the data in the cluster volume, its automated backups, snapshots and read replicas. Without it, anyone who gets access to the underlying storage or a snapshot can read the data.
Check Details
- Resource: RDS DB Cluster
- Check: Encryption of RDS cluster storage (
StorageEncrypted) - Risk: Data, backups and snapshots can be read in clear text if the storage or a snapshot is accessed or shared
Remediation via AWS Console
-
Log in to the AWS Management Console and open the Amazon RDS console.

- In the left navigation pane, click Databases, select the unencrypted DB cluster, and click Actions and then Take snapshot. Enter a snapshot name and click Take snapshot.
- In the left navigation pane, click Snapshots. Wait until the status of the snapshot is Available.
-
Select the snapshot and click Actions > Copy snapshot. Under Encryption, select the default AWS-managed key (
aws/rds) or a customer-managed KMS key, according to your security policy. Click Copy snapshot.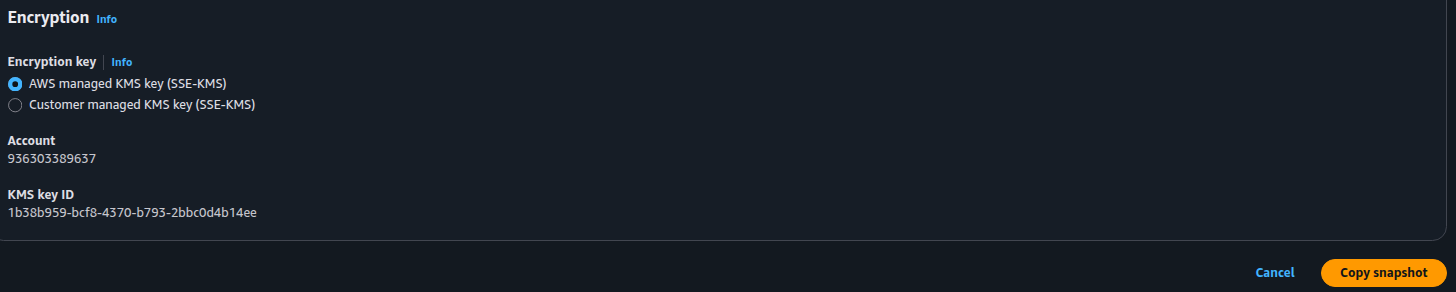
-
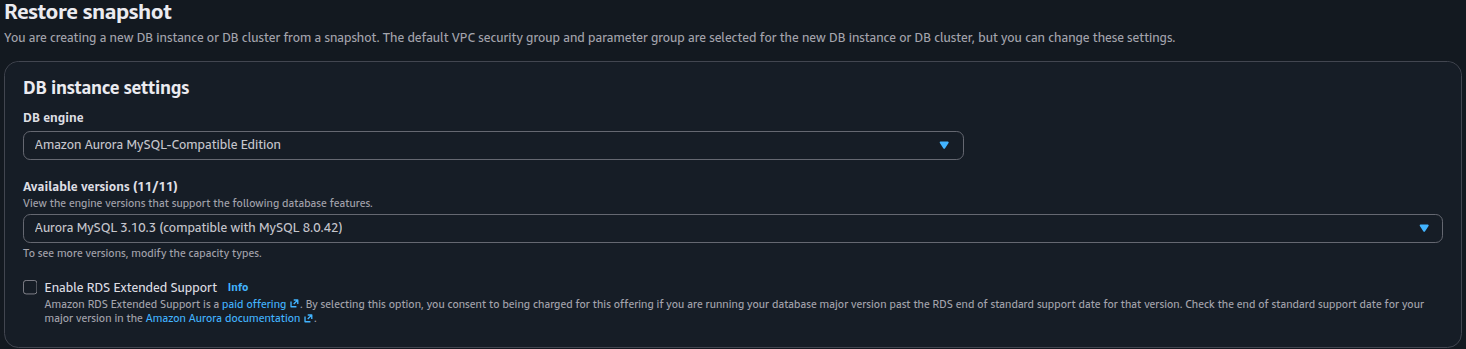
When the encrypted copy is Available, select it and click Actions and then Restore snapshot. Enter a new cluster name, choose the instance class, VPC, subnet group and security group, then click Restore DB cluster.
- Point your applications to the endpoints of the new cluster and test them.
- When you have confirmed that the new cluster works, delete the old cluster and the unencrypted snapshots. They still hold the data without encryption.
Remediation via AWS CLI
-
Log in to the AWS Management Console and click the CloudShell icon (
>_) in the top-right corner.
-
List the DB clusters where storage encryption is turned off. The output shows the cluster name, the engine and the engine version:
aws rds describe-db-clusters \
--query 'DBClusters[?StorageEncrypted==`false`].[DBClusterIdentifier,Engine,EngineVersion]' \
--output text
The command covers one region. Add
--region <region>to eachawscommand to check another. -
Stop writes to the cluster, then take a snapshot and wait until it is available:
aws rds create-db-cluster-snapshot \
--db-cluster-identifier <cluster-name> \
--db-cluster-snapshot-identifier <cluster-name>-unencrypted

aws rds wait db-cluster-snapshot-available \
--db-cluster-snapshot-identifier <cluster-name>-unencrypted
-
Copy the snapshot with a KMS key to create an encrypted snapshot:
aws rds copy-db-cluster-snapshot \
--source-db-cluster-snapshot-identifier <cluster-name>-unencrypted \
--target-db-cluster-snapshot-identifier <cluster-name>-encrypted \
--kms-key-id <kms-key-id>

aws rds wait db-cluster-snapshot-available \
--db-cluster-snapshot-identifier <cluster-name>-encrypted
-
Restore the encrypted snapshot as a new cluster and add an instance to it:
aws rds restore-db-cluster-from-snapshot \
--db-cluster-identifier <new-cluster-name> \
--snapshot-identifier <cluster-name>-encrypted \
--engine <engine> \
--kms-key-id <kms-key-id> \
--db-subnet-group-name <subnet-group-name> \
--vpc-security-group-ids <security-group-id>

aws rds create-db-instance \
--db-instance-identifier <new-cluster-name>-1 \
--db-cluster-identifier <new-cluster-name> \
--engine <engine> \
--db-instance-class <instance-class>

aws rds wait db-instance-available \
--db-instance-identifier <new-cluster-name>-1
-
Verify that the new cluster is encrypted:
aws rds describe-db-clusters \
--db-cluster-identifier <new-cluster-name> \
--query 'DBClusters[0].[DBClusterIdentifier,StorageEncrypted,KmsKeyId]' \
--output text
StorageEncryptedmust beTrue. -
Point your applications to the endpoints of the new cluster and test them. When you have confirmed that it works, delete the unencrypted snapshot and then the old cluster:
aws rds delete-db-cluster-snapshot \
--db-cluster-snapshot-identifier <cluster-name>-unencrypted
Delete the old cluster in the console, or with
aws rds delete-db-clusterafter its instances are deleted. Take a final snapshot only if you need one, and make sure it is encrypted.
Replace <cluster-name> with the identifier of the unencrypted cluster, and <new-cluster-name> with a name for the encrypted cluster.
Replace <engine> with the engine of the cluster, for example aurora-mysql or aurora-postgresql, and <instance-class> with an instance class, for example db.r6g.large.
Replace <kms-key-id> with the ID or ARN of your KMS key, <subnet-group-name> with the DB subnet group and <security-group-id> with the security group of the old cluster.
Repeat steps 3 to 7 for each cluster that step 2 lists.
Updated on 05 November, 2026