Other Articles
- SQL Database – Enable Database Encryption
- SQL Databases – Enable Backup
- SQL Database – Monitor CPU Utilization
- SQL Database – Monitor IO Utilization
- SQL Database – Monitor Memory Utilization
- SQL Database – Protect From Direct Internet Traffic
- SQL Server – Enable SQL Defender
- SQL Server – Block Public Firewall Rules
- SQL Server – Enable Auditing
- Storage Account – Enable Storage Encryption
- Storage Account – Disable Blob Public Access
- Storage Account – Disable Cross-Tenant Replication
- Storage Account – Disable Public Network Access
- Storage Account – Enable Microsoft Defender
- Storage Account – Enable Secure Transfer
- Storage Account – Enforce Minimum TLS Version
- Storage Account – Enforce Network Access Rule
- Storage Account – Enforce Private Endpoint Access
- Storage Account – Enable Blob Soft Delete
- Storage Account – Enable Blob Versioning
- User – Enable Azure MFA
- App Service – Disable Remote Debugging
- App Service – Enable Defender
- App Service – Enable Entra ID Registration
- App Service – Enable HTTP2
- App Service – Enforce Latest TLS Version
- App Service – Enforce Secure FTPS State
- App Service – Monitor Server Errors
- App Service – Redirect HTTP to HTTPS
- Cosmos DB – Enable Backup
- Cosmos DB – Enable Microsoft Defender
- Cosmos DB – Monitor Latency
- Cosmos DB – Ensure Private Connectivity
- Cosmos DB for PostgreSQL – Monitor CPU Utilization
- Cosmos DB for PostgreSQL – Monitor IO Utilization
- Cosmos DB for PostgreSQL – Monitor Memory Utilization
- Cosmos DB for PostgreSQL – Protect From Direct Internet Traffic
- Cosmos DB – Protect From Direct Internet Traffic
- Cosmos DB – Restrict Firewall Network Access
- Virtual Machine – Enable Defender
- Virtual Machine – Protect From Direct Internet Traffic
- Key Vault – Enable Defender
- Key Vault – Ensure Vault Recoverable
- Key Vault – Require Private Endpoint Access
- Key Vault – Enforce Keys Expiration
- Key Vault – Enable Purge Protection
- Key Vault – Use Azure RBAC Authorization
- MySQL Flexible Server – Enable Audit Log Events Connection
- MySQL Flexible Server – Enable Audit Logs
- MySQL Flexible Server – Enforce Minimum TLS Version
- PostgreSQL Flexible Server – Configure Log File Retention
- PostgreSQL Flexible Server – Enable Connection Logging
- PostgreSQL Flexible Server – Enable Connection Throttling
- PostgreSQL Flexible Server – Enable Disconnection Logging
- PostgreSQL Flexible Server – Enable Log Checkpoints
- Network Security Group – Ensure Flow Logs Captured
- General – Enable Auto Provisioning Log Analytics
- General – Enable Security Notifications
- General – Set Additional Email Address
- Cosmos DB – Enforce Minimum TLS Version
- PostgreSQL Flexible Server – Enforce Minimum TLS Version
- Container Instance – Enforce Use of Private Virtual Networks
- Container Instance – Enforce Managed Identity Usage
SQL Server – Require Microsoft Entra-Only Authentication
Secure Configuration Checks > Azure
This check ensures that Azure SQL servers accept only Microsoft Entra authentication. When Entra-only authentication is enabled, SQL logins with usernames and passwords can no longer be used, so access is controlled centrally through Microsoft Entra ID.
Check Details
- Resource: SQL Server
- Check: Require Entra-Only Authentication for SQL Servers
- Risk: If SQL authentication is allowed, passwords can be guessed, leaked or shared, and access cannot be centrally managed with features such as MFA and Conditional Access.
Before you start
- A Microsoft Entra admin must already be set on the SQL server.
- Applications and users that connect with SQL logins will stop working once this is enabled. Move them to Entra authentication (for example, managed identities) first.
Remediation via Azure Portal
-
Log in to the Azure Portal.

-
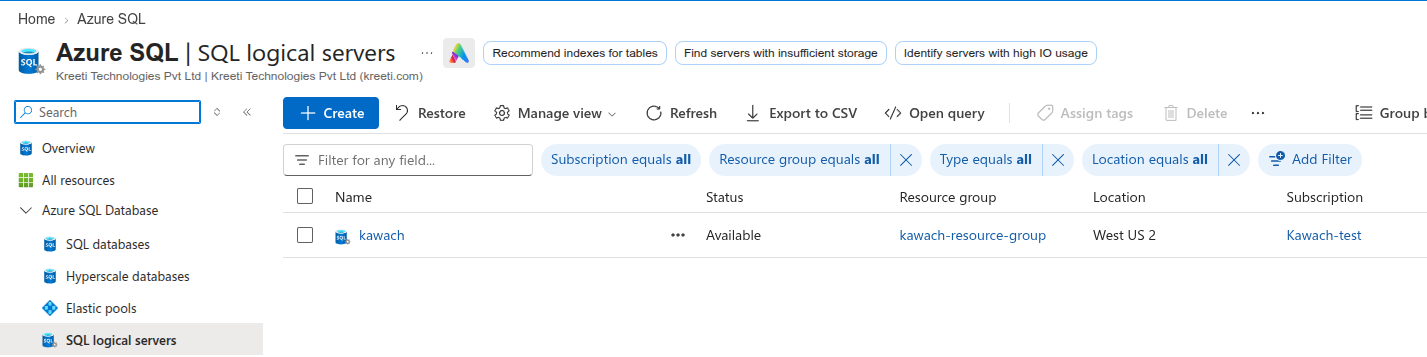
Navigate to SQL servers and select the affected SQL server.
-
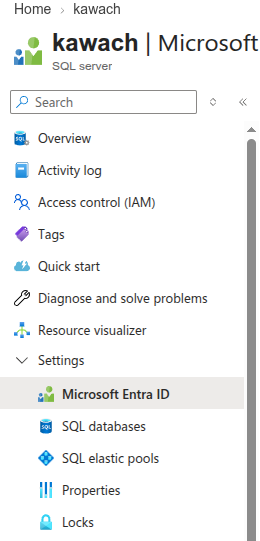
In the left menu, click on Microsoft Entra ID under Settings.
- If no admin is set, click Set admin and choose a user or group.
-
Select Support only Microsoft Entra authentication for this server.
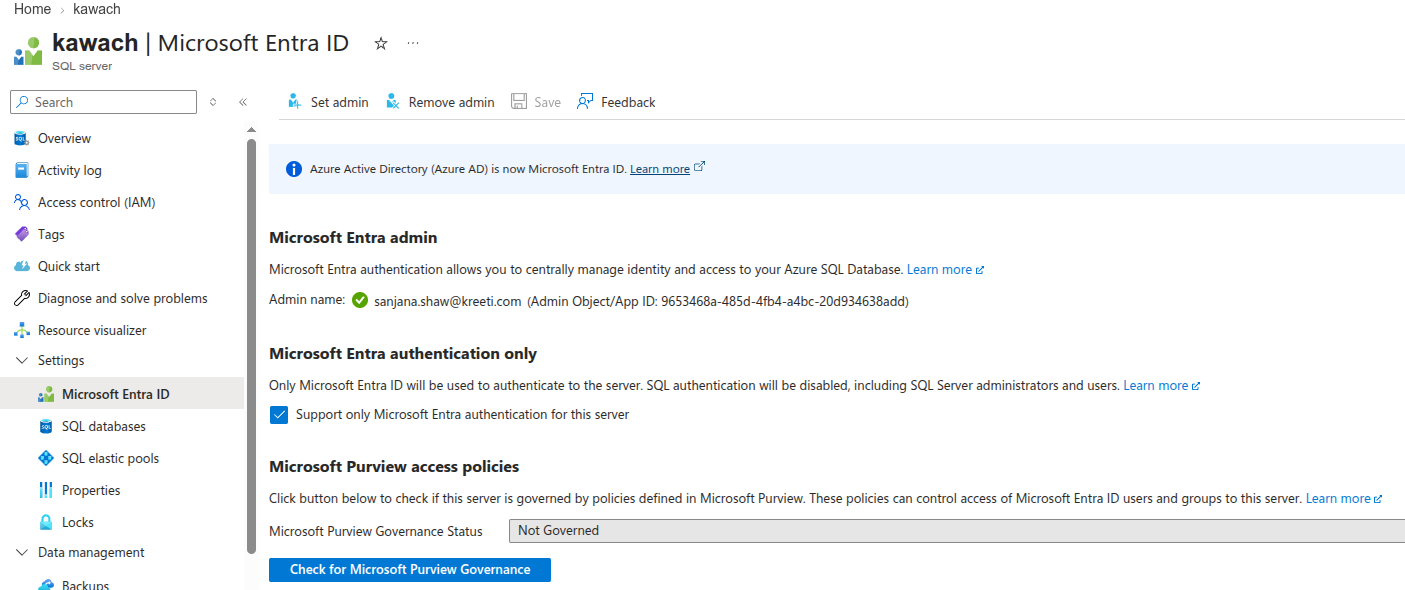
- Click Save to apply the changes.
Remediation via Azure CLI
-
Open Azure Cloud Shell from the Azure Portal or use a local
terminal with Azure CLI installed.

-
If no Entra admin is set, run the following command first:
az sql server ad-admin create \
--resource-group <resource-group-name> \
--server-name <sql-server-name> \
--display-name <admin-display-name> \
--object-id <admin-object-id>
-
Run the following command to enable Entra-only authentication:
az sql server ad-only-auth enable \
--resource-group <resource-group-name> \
--name <sql-server-name>
Replace
<resource-group-name>,<sql-server-name>,<admin-display-name>and<admin-object-id>with your actual values.
Updated on 03 November, 2026