Other Articles
- SQL Database – Enable Database Encryption
- SQL Databases – Enable Backup
- SQL Database – Monitor CPU Utilization
- SQL Database – Monitor IO Utilization
- SQL Database – Monitor Memory Utilization
- SQL Database – Protect From Direct Internet Traffic
- SQL Server – Enable SQL Defender
- SQL Server – Require Microsoft Entra-Only Authentication
- SQL Server – Block Public Firewall Rules
- SQL Server – Enable Auditing
- Storage Account – Enable Storage Encryption
- Storage Account – Disable Blob Public Access
- Storage Account – Disable Cross-Tenant Replication
- Storage Account – Disable Public Network Access
- Storage Account – Enable Microsoft Defender
- Storage Account – Enable Secure Transfer
- Storage Account – Enforce Minimum TLS Version
- Storage Account – Enforce Network Access Rule
- Storage Account – Enforce Private Endpoint Access
- Storage Account – Enable Blob Soft Delete
- Storage Account – Enable Blob Versioning
- User – Enable Azure MFA
- App Service – Disable Remote Debugging
- App Service – Enable Defender
- App Service – Enable Entra ID Registration
- App Service – Enable HTTP2
- App Service – Enforce Latest TLS Version
- App Service – Enforce Secure FTPS State
- App Service – Monitor Server Errors
- App Service – Redirect HTTP to HTTPS
- Cosmos DB – Enable Backup
- Cosmos DB – Enable Microsoft Defender
- Cosmos DB – Monitor Latency
- Cosmos DB – Ensure Private Connectivity
- Cosmos DB for PostgreSQL – Monitor CPU Utilization
- Cosmos DB for PostgreSQL – Monitor IO Utilization
- Cosmos DB for PostgreSQL – Monitor Memory Utilization
- Cosmos DB for PostgreSQL – Protect From Direct Internet Traffic
- Cosmos DB – Protect From Direct Internet Traffic
- Cosmos DB – Restrict Firewall Network Access
- Virtual Machine – Enable Defender
- Virtual Machine – Protect From Direct Internet Traffic
- Key Vault – Enable Defender
- Key Vault – Ensure Vault Recoverable
- Key Vault – Require Private Endpoint Access
- Key Vault – Enforce Keys Expiration
- Key Vault – Enable Purge Protection
- Key Vault – Use Azure RBAC Authorization
- MySQL Flexible Server – Enable Audit Log Events Connection
- MySQL Flexible Server – Enable Audit Logs
- MySQL Flexible Server – Enforce Minimum TLS Version
- PostgreSQL Flexible Server – Configure Log File Retention
- PostgreSQL Flexible Server – Enable Connection Logging
- PostgreSQL Flexible Server – Enable Connection Throttling
- PostgreSQL Flexible Server – Enable Disconnection Logging
- PostgreSQL Flexible Server – Enable Log Checkpoints
- Network Security Group – Ensure Flow Logs Captured
- General – Enable Auto Provisioning Log Analytics
- General – Enable Security Notifications
- General – Set Additional Email Address
- Cosmos DB – Enforce Minimum TLS Version
- PostgreSQL Flexible Server – Enforce Minimum TLS Version
- Container Instance – Enforce Use of Private Virtual Networks
Container Instance – Enforce Managed Identity Usage
Secure Configuration Checks > Azure
This check ensures that Azure container groups use a managed identity to authenticate to other Azure services. A managed identity is created and managed by Azure, so the containers do not need to store passwords, keys or connection strings.
Check Details
- Resource: Container Instance (Container Group)
- Check: Enforce Managed Identity Usage
- Risk: Without a managed identity, applications in the container must use stored credentials such as keys, passwords or connection strings. These can be leaked from the image or environment variables, and they have to be rotated manually.
Before you start
- A container group can use a system-assigned identity, a user-assigned identity, or both.
- After enabling the identity, grant it only the roles it needs on the Azure resources it accesses (for example, Key Vault Secrets User or Storage Blob Data Reader).
Remediation via Azure Portal
-
Log in to the Azure Portal.

-
Navigate to Container instances and select the affected container group.

-
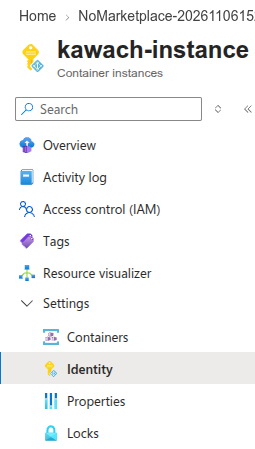
In the left menu, click on Identity under Settings.
-
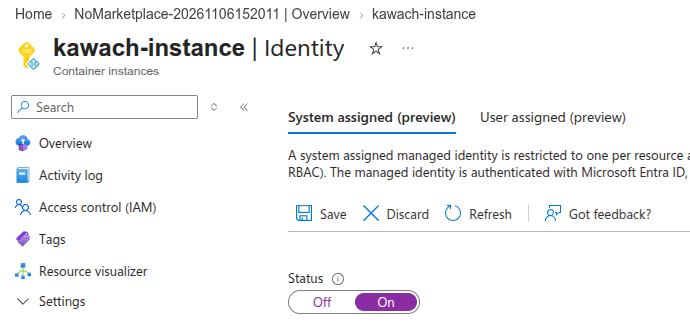
On the System assigned tab, set Status to On and click Save.
To use a user-assigned identity instead, open the User assigned tab and click Add.
- Click Yes to confirm.
- Open Access control (IAM) on the Azure resource the container needs to access and assign the required role to the managed identity.
Remediation via Azure CLI
-
Open Azure Cloud Shell from the Azure Portal or use a local
terminal with Azure CLI installed.

-
Run the following command to create the container group with a system-assigned managed identity:
az container create \
--resource-group <resource-group-name> \
--name <container-group-name> \
--image <image> \
--assign-identity
-
Run the following command to get the principal ID of the identity:
az container show \
--resource-group <resource-group-name> \
--name <container-group-name> \
--query identity.principalId \
--output tsv
-
Run the following command to grant the identity access to an Azure resource:
az role assignment create \
--assignee <principal-id> \
--role "<role-name>" \
--scope <resource-id>
Replace
<resource-group-name>,<container-group-name>,<image>,<principal-id>,<role-name>and<resource-id>with your actual values. To use a user-assigned identity, pass its resource ID to--assign-identityinstead. Managed identity is set when a container group is created, so to add it to an existing container group from the CLI, create the group again with--assign-identityand delete the old one.
Updated on 06 November, 2026