Other Articles
- Getting Started with the Organization Setup
- How to add employee details step by step?
- Getting Started with Policies
- Getting Started with Trainings
- Getting Started with Vendor Management
- Risk Module – User Help Guide
- Controls Module – Step-by-Step User Guide
- Privacy and Data Governance: A Comprehensive Guide for Modern Organizations
Pentest Flow – Adding and Managing Penetration Test Findings
Support > Pentest Management
11 February, 2026
The Pentests section in Kawach is designed to help security and compliance teams go beyond simply storing penetration test reports. It provides a structured workflow to log vulnerabilities, assign severity, monitor remediation, and maintain a clear audit trail of security improvements.
This ensures that findings from penetration tests are not just documented — but actively managed and resolved.
Step 1: Create a Pentest Record
The first step in the pentest lifecycle is creating a formal record of the penetration testing assessment.
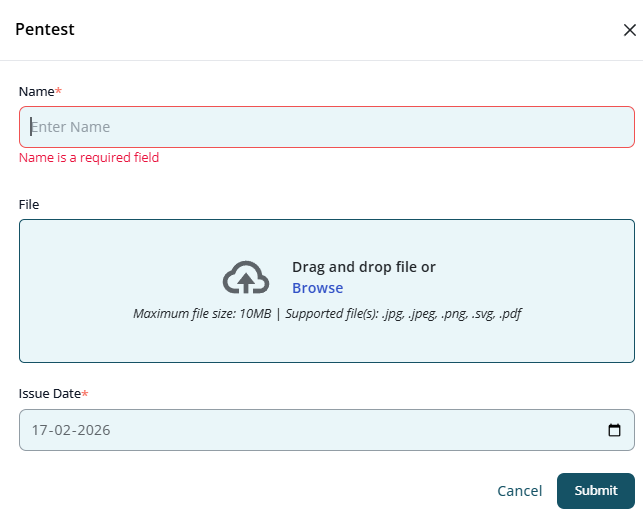
How to Create a Pentest
- Navigate to the Pentests section.
- Click Create Pentest (or equivalent action).
- Enter the required pentest details.
-
Pentest Name
Provide a clear and identifiable name.
Example: "External Network Pentest – Q1 2026" -
Pentest Report File
Upload the official penetration testing report (PDF, DOC, or other supported formats). This document serves as primary evidence for compliance and audits. -
Issue Date
Select the date when the report was issued by the testing team. - Click Submit.
Once submitted, the pentest record appears in the Pentests list and becomes available for vulnerability tracking.
Step 2: View Pentest Details
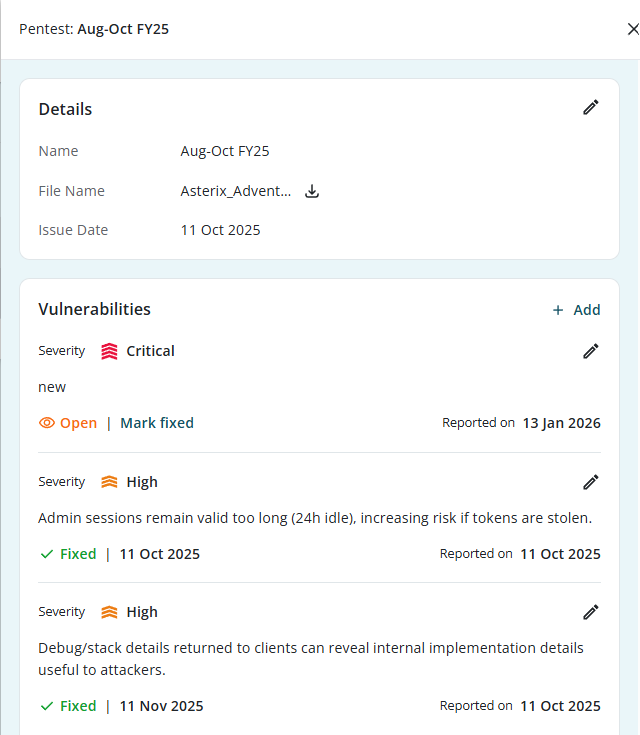
Clicking on a pentest record opens its detailed view. This page acts as the central workspace for managing all vulnerabilities associated with the penetration test.
Information Displayed
- Pentest Name – Identifies the assessment
- File Name –The uploaded report
- Issue Date – When the report was issued
- List of Vulnerabilities – All logged findings
- Status Overview – Open vs Fixed findings
This page ensures that all remediation efforts are tied directly to the original assessment.
Step 3: Add Vulnerabilities to the Pentest
A penetration test report typically contains multiple findings. Instead of treating the report as a static document, Kawach allows you to break it into actionable items.
How to Add a Vulnerability
Within the pentest details page:
- Click Add Vulnerability.
- Enter required information:
-
Severity
Select one of the following levels:
- Critical – Immediate risk, active exploitation possible
- High – Significant risk requiring urgent remediation
- Medium – Moderate risk, fix within standard SLA
- Low – Minor issue, low impact
Severity helps prioritize remediation efforts.
-
Summary
Provide a clear, concise description of the issue.
A good vulnerability summary includes:
- What the issue is
- Where it was found
- Why it is risky
- Potential impact
Example: "SQL Injection vulnerability identified in login endpoint allowing unauthorized database access."
- Click Submit.
- Linked to the pentest
- Individually trackable
- Included in reporting and dashboards
Each vulnerability is now:
Step 4: Track and Fix Vulnerabilities
Managing vulnerabilities effectively is critical for maintaining a strong security posture.
Vulnerability Status
By default, newly added vulnerabilities are marked as:
- Open
They remain open until remediation is completed and validated.
Remediation Workflow
- Assign remediation to the relevant technical team.
- Implement the fix.
- Validate that the issue is resolved.
- Mark the vulnerability as Fixed.
This provides a clear lifecycle:
Open → Remediated → Verified → Fixed
Why Tracking Matters
Tracking ensures:
- No finding is overlooked
- Critical issues are prioritized
- Remediation timelines are monitored
- Compliance evidence is maintained
- Security improvements are measurable
Pentest Management Flow (Detailed Summary)
- Create a Pentest Record.
- Open Pentest Details
- Add Individual Vulnerabilities
- Track remediation progress.
- Mark vulnerabilities as fixed
Upload report and record the issue date.
Use it as the central management workspace.
Assign severity and write clear summaries.
Monitor open findings and ensure accountability.
Once resolved and validated, update status.
Best Practices for Managing Pentest Findings
-
Break Down Reports into Actionable Items
Avoid leaving findings only in uploaded reports—log each issue individually.
-
Use Clear Severity Criteria
Align severity ratings with industry standards (e.g., CVSS where applicable).
-
Prioritize Critical & High Findings
Set internal SLAs for remediation:
- Critical: Immediate
- High: Within defined short-term window
- Medium / Low: Scheduled remediation
-
Document Fix Validation
Ensure that fixes are tested before marking as resolved.
-
Maintain Audit Readiness
Pentest tracking supports evidence requirements for:
- ISO 27001 (Vulnerability Management controls)
- SOC 2 (Security & Change Management)
- PCI-DSS (Regular security testing requirements)
- Internal cybersecurity governance
How Pentest Tracking Strengthens Security
By integrating pentest findings into a structured workflow, Kawach enables organizations to:
- Move from reactive to proactive security
- Reduce vulnerability exposure windows
- Improve accountability across teams
- Maintain a transparent remediation history
- Demonstrate continuous improvement to auditors
Conclusion
The Pentests module in Kawach transforms penetration testing from a static compliance exercise into a dynamic vulnerability management process.
By:
- Creating structured pentest records
- Logging individual vulnerabilities
- Assigning severity levels
- Tracking remediation
- Marking issues as fixed
Organizations can ensure that every identified weakness is documented, addressed, and closed—leading to stronger security posture, improved governance, and sustained audit readiness.